• ×
    Information
    Windows update impacting certain printer icons and names. Microsoft is working on a solution.
    Click here to learn more
    Information
    Need Windows 11 help?
    Check documents on compatibility, FAQs, upgrade information and available fixes.
    Windows 11 Support Center.
  • post a message
  • ×
    Information
    Windows update impacting certain printer icons and names. Microsoft is working on a solution.
    Click here to learn more
    Information
    Need Windows 11 help?
    Check documents on compatibility, FAQs, upgrade information and available fixes.
    Windows 11 Support Center.
  • post a message
Guidelines
If you're having print quality issues Click here for more tips!
Check some of the most frequent questions about Instant Ink: HP INSTANT INK, HP+ PLANS: INK AND TONER.


Check out our Black or Color Ink Not Printing, Other Print Quality Issues info about: Print quality and Cartridge Issues.
HP Recommended
HP OfficeJet Pro 6978 All-in-One Printer

I have an HP Office Jet Pro 6978 that stopped printing after I installed a new black printer cartridge.  Color cartridges were also low, so I decided to install new color cartridges in case that was the problem.  I also reinstalled the driver.  No change.  Then noticed lots of splattered black ink inside the printer, far right side, under the location for the black cartridge.  Is the printer ruined? I can't reach to clean the gooey mess inside.  Please advise!

1 REPLY 1
HP Recommended

Hi @Johanne2024,


Welcome to the HP Support Community. 


I'd be happy to help you! 


I understand the black ink is leaking into the corner of your printer.


Have you tried checking with a different ink cartridge?


Try using a different ink cartridge and check if it helps.


As you mentioned the black ink is leaking into the corner of your printer.


It is NOT supposed to leak ink not from anywhere, It sounds like a hardware issue to me.


Please contact HP support for service options.


Clean the cartridge contacts


:right_arrow: Follow these steps to clean the contacts on the cartridge and in the cartridge slot.

  caution:

:right_arrow: Clean the cartridges one at a time. Do not leave a cartridge outside the product for more than 30 minutes.

Gather the following materials:

Clean, lint-free swabs that will not come apart or leave fibers

A sheet of paper to place the cartridges on

Press the Power button () to turn on the product.

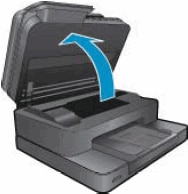
Open the cartridge access door. The carriage moves to the access area.

Figure : Open the cartridge access door

  1. Image: Open the cartridge access door

Disconnect the power cord from the rear of the product.

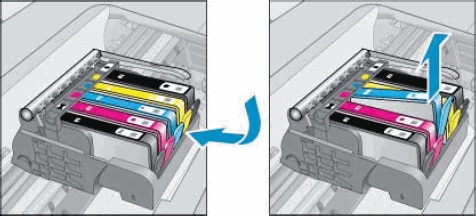
Press the tab on the front of the cartridge in to release it, and then pull up on the cartridge to remove it from the slot.

Figure : Remove the cartridge from the slot

  1. Image: Remove the cartridge from the slot

Hold the cartridge by its sides, and then find the electrical contacts on the bottom of the cartridge. The electrical contacts are four small rectangles of copper-colored metal.

Figure : Cartridge contacts

Cartridge contacts

Inspect the contacts for ink and debris buildup.

Wipe the contacts with a swab until no debris remains on them.

  caution:

Be careful to wipe only the contacts. Do not smear any ink or debris elsewhere on the cartridge.

Turn the cartridge on its side, and then place it onto the sheet of paper.

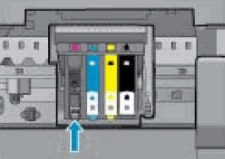
Locate the electrical contacts in the cartridge slot. The contacts are four copper-colored pins.

Figure : Location of the cartridge slot contacts

  1. Image: Location of the cartridge slot contacts

Wipe the contacts with a swab until no debris remains on them.

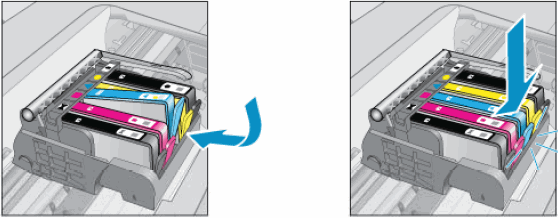
With the contacts facing down, slide the cartridge into its slot. Press down on the cartridge until it clicks into place.

Figure : Insert the cartridge

  1. Image: Insert the cartridge

Repeat these steps to clean and reinsert any of the other cartridges.

Close the cartridge access door.

Figure : Close the cartridge access door

  1. Image: Close the cartridge access door

Reconnect the power cord to the rear of the product.

Press the Power button () to turn on the product if it does not turn on automatically.


Hope this helps! Keep me posted for further assistance.


 Please mark this post as Accepted Solution” if the issue is resolved and if you feel this reply was helpful click “Yes”.

Elohi_NR
I am an HP Employee
† The opinions expressed above are the personal opinions of the authors, not of HP. By using this site, you accept the <a href="https://www8.hp.com/us/en/terms-of-use.html" class="udrlinesmall">Terms of Use</a> and <a href="/t5/custom/page/page-id/hp.rulespage" class="udrlinesmall"> Rules of Participation</a>.